Mail Merge: A Step-by-Step Guide
- Diana Sparacio

- Nov 1, 2022
- 4 min read
Updated: Feb 10, 2023
So you’ve decided to do a mail merge with Gmail and Google Sheets or maybe you’re still digging through the internet to find out if it’s right for you. If either option applies, then you’ve come to the right place.
What is a mail merge?
Mail merge is a process that allows you to automatically populate an email template you create with data from Google Sheets. This way, you can send multiple personalized emails with minimal effort. Imagine sending the same business update to dozens of contacts - for example - but in each email, you reference that recipient by name. Using a mail merge, you can send huge batches of personalized emails at once. The emails are sent from your Gmail account so you can receive and respond to any recipient replies right in your usual inbox and workflow (Google). Mail merges are a great tool for relationship building, lead nurturing, and email marketing.
Getting recipient info organized
Before you begin the actual mail merge and email deployment process, you’ll want to set up your mail merge spreadsheet with all the contacts you want to reach.
To do this, make a copy of this Gmail/Sheets Mail Merge sample spreadsheet. Remove any columns you won’t need (ex: Discount code and Discount Amount if you’re not offering those).

In this new mail merge spreadsheet, create a row for every contact who will receive the email and populate it with the personalized data you anticipate the email will include. Note that this probably isn’t a manual process - we’re willing to bet you’re copying these contacts from somewhere else like Hubspot or another CRM platform.
Managing multiple spreadsheets
Note that Gmail limits emails sent via mail merge to just 1,000 per day. If you want to reach more than 1,000 recipients with your email, you’ll want to make multiple mail merge spreadsheets. For instance, if you want to send your email to 10,000 contacts – you’ll need 10 spreadsheets.
If you are going to have multiple spreadsheets, it’s a good idea to name them in a way that lets you keep track of all of them individually. Here are some examples:
Note that you’ll want to revisit that naming structure once you begin sending the emails. Once you’ve sent an email using a mail merge spreadsheet, you’ll want to flag it so you don’t confuse it with another mail merge spreadsheet and accidentally send the same email to those people again. Here are some examples of naming conventions that can easily be adapted for flagging:
Now that you know the basics, it’s time to get started!
Starting your mail merge
Step 1: Log into your Gmail account on a web browser.
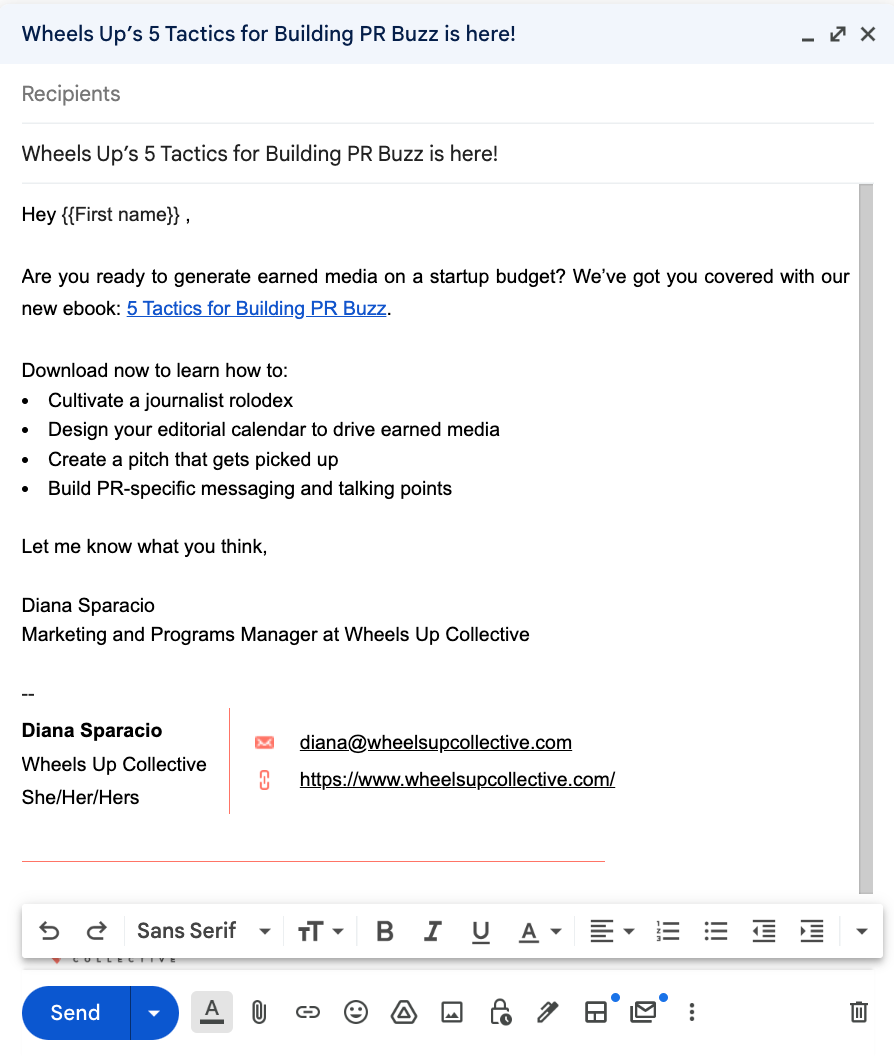
Step 2: Compose a new email. Enter the email copy you want to send. Now here’s where it gets cool: For any section where you want the mail merge to pull text from your spreadsheet, you’ll tag it. To tag it, add 2 curly brackets on each end of the personalized field, and put the corresponding column header from the spreadsheet inside those brackets. For ease, we’ll only customize the recipient name in this example.
For the name, you’d add {{First name}} (see screenshot below)
Make sure the format like font, text size, etc is consistent, and add a signature as we did below.
Step 3: Once the email is set up, open a new browser tab. IMPORTANT: Make sure to keep your Gmail browser tab open through the remainder of the steps (like pictured above).
Step 4: In the new browser tab, open the mail merge spreadsheet with the email addresses and personalized data for your intended recipients.
Step 6: Now it’s time to send the email using mail merge. On the mail merge spreadsheet, select Mail Merge on the top right of the menu. Then click Send Emails.
You will likely see an “Authorization Required” message pop up. It means that a script attached to this document needs your permission to run. Click Continue. It will prompt you to log into your email again. Click Allow.

Step 7: After providing the authorization. Click Mail Merge > Send Emails again.
Step 8: It will ask you to type or copy/paste the subject line of the Gmail draft message you would like to use this mail merge with. Make sure this matches EXACTLY with the subject line of the email that you have open in the Gmail browser tab. Click Ok.
The script will say it’s running. This will happen for a while. I like to keep both the Gmail tab and the spreadsheet tab open until it’s done. You can check the progress of the send by opening your email’s “sent” folder to make sure emails are going out.
ALL DONE 🎉
Congrats, you’ve successfully sent emails using your first mail merge! Want to learn more tips and tricks? Sign up for our monthly newsletter!


